&state=
```
You will use this authorization code to call our token endpoint to exchange
for an access and refresh token pair.
Used to prevent CSRF attacks. Will be the value you used when constructing
the authorization url. See our [Security
Guide](/resources/datavault-security-guide) for more information.
## Exchange tokens
Once you have received the authorization code, you can exchange it for an access and refresh token pair by calling our `/oauth/token` endpoint.
```bash {{ title: 'cURL' }}
curl -X POST \
-H "Content-Type: application/json" \
-d '{
"grant_type": "authorization_code",
"code": "'$OAUTH_CODE'",
"code_verifier": "'$CODE_VERIFIER'",
"client_secret": "'$CLIENT_SECRET'",
"client_id": "'$CLIENT_ID'",
"redirect_uri": "'$REDIRECT_URI'",
"state": "'$STATE'"
}' \
https://source.tartle.co/oauth/token
```
```javascript
const response = await fetch('https://source.tartle.co/oauth/token', {
method: 'POST',
headers: {
'Content-Type': 'application/json',
},
body: JSON.stringify({
grant_type: 'authorization_code',
code: authorizationCode,
code_verifier: codeVerifier,
client_secret: process.env.CLIENT_SECRET,
client_id: process.env.CLIENT_ID,
redirect_uri: redirectUri,
state: state,
}),
})
const data = await response.json()
```
```java
JSONObject requestBody = new JSONObject()
.put("grant_type", "authorization_code")
.put("code", authorizationCode)
.put("code_verifier", codeVerifier)
.put("client_secret", System.getenv("CLIENT_SECRET"))
.put("client_id", System.getenv("CLIENT_ID"))
.put("redirect_uri", redirectUri)
.put("state", state);
HttpRequest request = HttpRequest.newBuilder()
.uri(URI.create("https://source.tartle.co/oauth/token"))
.header("Content-Type", "application/json")
.POST(HttpRequest.BodyPublishers.ofString(requestBody.toString()))
.build();
HttpResponse response = HttpClient.newHttpClient()
.send(request, HttpResponse.BodyHandlers.ofString());
JSONObject data = new JSONObject(response.body());
```
```ruby {{ title: 'Ruby on rails' }}
# Ruby on Rails (using HTTParty)
response = HTTParty.post(
'https://source.tartle.co/oauth/token',
headers: { 'Content-Type': 'application/json' },
body: {
grant_type: 'authorization_code',
code: authorization_code,
code_verifier: code_verifier,
client_secret: ENV['CLIENT_SECRET'],
client_id: ENV['CLIENT_ID'],
redirect_uri: redirect_uri,
state: state
}.to_json
)
data = JSON.parse(response.body)
```
```python {{ title: 'Python' }}
import requests
response = requests.post(
'https://source.tartle.co/oauth/token',
json={
'grant_type': 'authorization_code',
'code': authorization_code,
'code_verifier': code_verifier,
'client_secret': os.environ.get('CLIENT_SECRET'),
'client_id': os.environ.get('CLIENT_ID'),
'redirect_uri': redirect_uri,
'state': state
},
headers={'Content-Type': 'application/json'}
)
data = response.json()
```
```php {{ title: 'PHP' }}
$data = [
'grant_type' => 'authorization_code',
'code' => $authorizationCode,
'code_verifier' => $codeVerifier,
'client_secret' => getenv('CLIENT_SECRET'),
'client_id' => getenv('CLIENT_ID'),
'redirect_uri' => $redirectUri,
'state' => $state
];
$ch = curl_init('https://source.tartle.co/oauth/token');
curl_setopt($ch, CURLOPT_RETURNTRANSFER, true);
curl_setopt($ch, CURLOPT_POST, true);
curl_setopt($ch, CURLOPT_POSTFIELDS, json_encode($data));
curl_setopt($ch, CURLOPT_HTTPHEADER, ['Content-Type: application/json']);
curl_setopt($ch, CURLOPT_TIMEOUT, 10);
$response = curl_exec($ch);
curl_close($ch);
$data = json_decode($response, true);
```
This is a standard OAuth 2.0 parameter, set it to `authorization_code` when
exchanging the authorization code for an access and refresh token pair.
The authorization code you received from the redirect.
The code verifier you used when constructing the authorization url. See our
[Security Guide](/resources/datavault-security-guide) for more information.
The client secret you saved somewhere when you created the client. This was
only available to you at the time of creation and should be stored securely.
See our [Security Guide](/resources/datavault-security-guide) for more
information.
The client id you received when you created the client and you can find it
in your [developer
settings](https://source.tartle.co/buyers/developer_settings/?current_tab=oauthApps).
The redirect uri you used when you created the client and you can find it in
your [developer
settings](https://source.tartle.co/buyers/developer_settings/?current_tab=oauthApps).
The state you used when you constructed the authorization url. See our
[Security Guide](/resources/datavault-security-guide) for more information.
You will receive a JSON response with the following properties
```json {{ title: 'Response' }}
{
"access_token": "",
"token_type": "Bearer",
"expires_in": 86400,
"refresh_token": "",
"scope": "push_packet",
"created_at": ""
}
```
Use in the `Authorization` header to push data to the data packets
associated with your client. It is valid for 24 hours. After that period,
you can use the `refresh_token` returned in the response to exchange for a
new access token.
When your access token expires, you can call the `/oauth/token` endpoint to
exchange it for a new access token. After the exchange, this token will be
revoked, so make sure you save the new refresh token returned in the
exchange response.
To exchange an access token for a refresh token, you would use the same `/oauth/token` endpoint you used to exchange
the authorization code but with the following body:
```json {{ title: 'Request body' }}
{
"grant_type": "refresh_token",
"refresh_token": "",
"client_secret": "",
"client_id": "",
"redirect_uri": ""
}
```
The response will be in the same format as before. You need to make sure you save the new refresh token returned in the
exchange response, as the old one will be revoked.
Congratulations! You have successfully implemented the authorization flow and are ready to begin
[pushing data packets](/datavault-connect/pushing-data-packets) to your users' DataVaults.
---
## / datavault-connect / token-refresh
Source: https://documentation.tartle.co/datavault-connect/token-refresh
# Token expiration
As a security best practice, our access tokens have a lifetime of 24 hours. After that time has elapsed, if you try
to use the token to push a data packet, you will receive a `401 Unauthorized` error.
You can verify the token expiration before making your request by checking the `expires_at` value in the decoded JWT (JSON Web Token).
We recommend decoding the token when you receive it and saving the `expires_at` value alongside your access and your refresh token.
## Refreshing the token
In order to refresh an access token you need to make a request to the `/oauth/token` endpoint as you did before but
using the `refresh_token` grant type and the refresh token you saved originally.
```bash {{ title: 'cURL' }}
curl -X POST \
-H "Content-Type: application/json" \
-d '{
"grant_type": "refresh_token",
"refresh_token": "'$REFRESH_TOKEN'",
"client_secret": "'$CLIENT_SECRET'",
"client_id": "'$CLIENT_ID'",
"redirect_uri": "'$REDIRECT_URI'"
}' \
https://source.tartle.co/oauth/token
```
```javascript
const response = await fetch('https://source.tartle.co/oauth/token', {
method: 'POST',
headers: {
'Content-Type': 'application/json',
},
body: JSON.stringify({
grant_type: 'refresh_token',
refresh_token: refreshToken,
client_secret: process.env.CLIENT_SECRET,
client_id: process.env.CLIENT_ID,
redirect_uri: redirectUri,
}),
})
const data = await response.json()
```
```java
JSONObject requestBody = new JSONObject()
.put("grant_type", "refresh_token")
.put("refresh_token", refreshToken)
.put("client_secret", System.getenv("CLIENT_SECRET"))
.put("client_id", System.getenv("CLIENT_ID"))
.put("redirect_uri", redirectUri);
HttpRequest request = HttpRequest.newBuilder()
.uri(URI.create("https://source.tartle.co/oauth/token"))
.header("Content-Type", "application/json")
.POST(HttpRequest.BodyPublishers.ofString(requestBody.toString()))
.build();
HttpResponse response = HttpClient.newHttpClient()
.send(request, HttpResponse.BodyHandlers.ofString());
JSONObject data = new JSONObject(response.body());
```
```ruby {{ title: 'Ruby on rails' }}
# Ruby on Rails (using HTTParty)
response = HTTParty.post(
'https://source.tartle.co/oauth/token',
headers: { 'Content-Type': 'application/json' },
body: {
grant_type: 'refresh_token',
refresh_token: refresh_token,
client_secret: ENV['CLIENT_SECRET'],
client_id: ENV['CLIENT_ID'],
redirect_uri: redirect_uri
}.to_json
)
data = JSON.parse(response.body)
```
```python {{ title: 'Python' }}
import requests
response = requests.post(
'https://source.tartle.co/oauth/token',
json={
'grant_type': 'refresh_token',
'refresh_token': refresh_token,
'client_secret': os.environ.get('CLIENT_SECRET'),
'client_id': os.environ.get('CLIENT_ID'),
'redirect_uri': redirect_uri
},
headers={'Content-Type': 'application/json'}
)
data = response.json()
```
```php {{ title: 'PHP' }}
$data = [
'grant_type' => 'refresh_token',
'refresh_token' => $refreshToken,
'client_secret' => getenv('CLIENT_SECRET'),
'client_id' => getenv('CLIENT_ID'),
'redirect_uri' => $redirectUri
];
$ch = curl_init('https://source.tartle.co/oauth/token');
curl_setopt($ch, CURLOPT_RETURNTRANSFER, true);
curl_setopt($ch, CURLOPT_POST, true);
curl_setopt($ch, CURLOPT_POSTFIELDS, json_encode($data));
curl_setopt($ch, CURLOPT_HTTPHEADER, ['Content-Type: application/json']);
curl_setopt($ch, CURLOPT_TIMEOUT, 10);
$response = curl_exec($ch);
curl_close($ch);
$data = json_decode($response, true);
```
This is a standard OAuth 2.0 parameter, set it to `refresh_token` when
refreshing the access token.
The refresh token you saved originally.
The client secret you saved somewhere when you created the client. This was
only available to you at the time of creation and should be stored securely.
See our [Security Guide](/resources/datavault-security-guide) for more
information.
The client id you received when you created the client and you can find it
in your [developer
settings](https://source.tartle.co/buyers/developer_settings/?current_tab=oauthApps).
The redirect uri you used when you created the client and you can find it in
your [developer
settings](https://source.tartle.co/buyers/developer_settings/?current_tab=oauthApps).
You can find an example of refreshing a token in the [TARTLE OAuth Test App](https://github.com/Tartle-co/tartle-oauth-testapp/blob/main/src/actions/tartleActions.ts)
---
## / endlinks / api-calls
Source: https://documentation.tartle.co/endlinks/api-calls
# Using Endlinks with api calls
After your user has completed the flow you've implemented on your site, you need to report the outcome to TARTLE.
The most flexible method for handling the result of your user's actions at the end of an endlink flow is
to call one of the TARTLE Endlink endpoints from your backend or frontend code.
Depending on how you [captured and saved the token](/endlinks/token-handling), you will need to then retrieve it
and add it to the [appropriate endpoint](/endlinks#endlink-status-endpoints).
For the examples below, we will use the `complete` endpoint, but you can use the other endpoints the same manner.
As before, for a more reliable implementation, we recommend doing this server-side.
## Server-side examples
```js {{ title: 'Express' }}
const reportEndlinkComplete = async (req, res) => {
const token = req.session.tartle_endlink_token
if (!token) {
// CRITICAL: Log missing token error - you will need it to debug possible issues.
return false
}
try {
const response = await fetch(
`https://source.tartle.co/api/v3/endlinks/complete?tartle_endlink_token=${token}`,
)
if (!response.ok) {
// WARNING: Log HTTP status code and response text you might need to work with TARTLE to resolve.
return false
}
return true
} catch (error) {
// ERROR: Log error details you might need to work with TARTLE to resolve.
return false
}
}
```
```js {{ title: 'Nextjs api' }}
const reportEndlinkComplete = async (req) => {
const session = await getSession({ req })
const token = session?.tartle_endlink_token
if (!token) {
// CRITICAL: Log missing token error - you will need it to debug possible issues.
return false
}
try {
const response = await fetch(
`https://source.tartle.co/api/v3/endlinks/complete?tartle_endlink_token=${token}`,
)
if (!response.ok) {
// WARNING: Log HTTP status code and response text you might need to work with TARTLE to resolve.
return false
}
return true
} catch (error) {
// ERROR: Log error details you might need to work with TARTLE to resolve.
return false
}
}
```
```ruby {{ title: 'Rails' }}
def report_endlink_complete
token = session[:tartle_endlink_token]
unless token.present?
# CRITICAL: Log missing token error - you will need it to debug possible issues.
return false
end
begin
response = HTTP.get("https://source.tartle.co/api/v3/endlinks/complete", params: { tartle_endlink_token: token })
unless response.status.success?
# WARNING: Log HTTP status code and response text you might need to work with TARTLE to resolve.
return false
end
return true
rescue => e
# ERROR: Log error details you might need to work with TARTLE to resolve.
return false
end
end
```
```java {{ title: 'Java Spring' }}
public boolean reportEndlinkComplete(HttpSession session) {
String token = (String) session.getAttribute("tartle_endlink_token");
if (token == null || token.isEmpty()) {
// CRITICAL: Log missing token error - you will need it to debug possible issues.
return false;
}
try {
String url = "https://source.tartle.co/api/v3/endlinks/complete?tartle_endlink_token=" + token;
RestTemplate restTemplate = new RestTemplate();
ResponseEntity response = restTemplate.getForEntity(url, String.class);
if (!response.getStatusCode().is2xxSuccessful()) {
// WARNING: Log HTTP status code and response text you might need to work with TARTLE to resolve.
return false;
}
return true;
} catch (Exception e) {
// ERROR: Log error details you might need to work with TARTLE to resolve.
return false;
}
}
```
```php {{ title: 'PHP' }}
function reportEndlinkComplete() {
$token = $_SESSION['tartle_endlink_token'] ?? null;
if (!$token) {
// CRITICAL: Log missing token error - you will need it to debug possible issues.
return false;
}
try {
$url = "https://source.tartle.co/api/v3/endlinks/complete?tartle_endlink_token=" . urlencode($token);
$context = stream_context_create([
'http' => [
'method' => 'GET',
'header' => 'Content-Type: application/json'
]
]);
$response = file_get_contents($url, false, $context);
if ($response === false) {
// WARNING: Log HTTP status code and response text you might need to work with TARTLE to resolve.
return false;
}
$status = $http_response_header[0];
if (strpos($status, '200') === false) {
// WARNING: Log HTTP status code and response text you might need to work with TARTLE to resolve.
return false;
}
return true;
} catch (Exception $e) {
// ERROR: Log error details you might need to work with TARTLE to resolve.
return false;
}
}
```
```python {{ title: 'Python' }}
def report_endlink_complete(request):
token = request.session.get('tartle_endlink_token')
if not token:
# CRITICAL: Log missing token error - you will need it to debug possible issues.
return False
try:
response = requests.get(
f"https://source.tartle.co/api/v3/endlinks/complete?tartle_endlink_token={token}"
)
if not response.ok:
# WARNING: Log HTTP status code and response text you might need to work with TARTLE to resolve.
return False
return True
except Exception as e:
# ERROR: Log error details you might need to work with TARTLE to resolve.
return False
```
## Client-side examples
You can do this client side, but be aware that due to browser versions, security settings, and other factors, this
is less reliable. Make sure you log errors thoroughly so you can debug any possible issues.
```js {{ title: 'Using localStorage' }}
function reportEndlinkComplete() {
const token = localStorage.getItem('tartleEndlinkToken')
if (!token) {
// CRITICAL: Log missing token error - you will need it to debug possible issues.
return false
}
try {
const response = await fetch(
`https://source.tartle.co/api/v3/endlinks/complete?tartle_endlink_token=${token}`
)
if (!response.ok) {
// WARNING: Log HTTP status code and response text you might need to work with TARTLE to resolve.
return false
}
return true
} catch (error) {
// ERROR: Log error details you might need to work with TARTLE to resolve.
return false
}
}
```
```js {{ title: 'Using cookies' }}
function reportEndlinkComplete() {
const cookies = document.cookie.split(';')
const tokenCookie = cookies.find(cookie => cookie.trim().startsWith('tartleEndlinkToken='))
const token = tokenCookie ? tokenCookie.split('=')[1].trim() : null
if (!token) {
// CRITICAL: Log missing token error - you will need it to debug possible issues.
return false
}
try {
const response = await fetch(
`https://source.tartle.co/api/v3/endlinks/complete?tartle_endlink_token=${token}`
)
if (!response.ok) {
// WARNING: Log HTTP status code and response text you might need to work with TARTLE to resolve.
return false
}
return true
} catch (error) {
// ERROR: Log error details you might need to work with TARTLE to resolve.
return false
}
}
```
## Considerations
- The `tartle_endlink_token` is only valid for one hour, so make sure you call the endpoint within that time frame.
- Please make sure to log errors and failures so you can debug any issues, if you don't report an outcome due to an error, we will treat it as a failure, and the user **will not receive payments** for this packet.
Having issues? see our [Endlink troubleshooting guide](/endlinks/troubleshooting).
---
## / endlinks / creating-endlinks
Source: https://documentation.tartle.co/endlinks/creating-endlinks
# Creating Endlinks
To use Endlinks you first need to create a packet with an endlink question and submit it to TARTLE for review.
Here's a quick guide for the process.
## Create a packet
1. Log in to your [buyer account](https://source.tartle.co/buyers)
2. Go to the [packet suggestion page](https://source.tartle.co/buyers/suggestions/new)
3. Give your packet a short name and a good description.
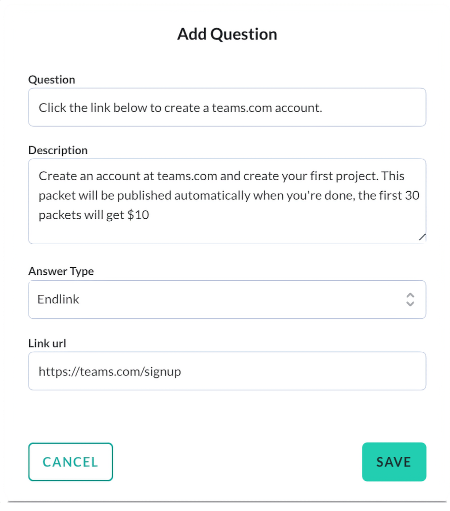
4. Click 'ADD' in the question input box
5. Enter the title and description for this question, be sure to include details on what they will be required to do when on your site and what is the benefit of doing so.
6. Select 'Endlink' as the answer type
7. Enter the link to your site.
The system will automatically add a `tartle_endlink_token` url parameter to
the link. This token is unique to every user & packet, and you will use it to
report the results of the endlink. See the [parameters section](#parameters)
below for more details.
For example, you could use a packet with an endlink to direct users to open an account with your company,
the packet would be published once they have successfully done so. If you have a standing bid for 30 packets
at $10 a packet, you will effectively be paying the first 30 users to sign up a $10 bonus.
This is a simple example, but the actions taken on your site could be anything you want. You just need to
take care of correctly reporting the results to TARTLE following the next guide.
## Endlink parameters
The system will automatically add a `tartle_endlink_token` and `seller_id` url parameter to the link without you having to
do anything. You will need the token as explained on the rest of the guides in this documentation section. The `seller_id`
is added for your convenience if you need it for associating your user with ours.
However, in some cases you may need more information or more control over the name of the parameter. In that
case you can use double curly braces with a variable name to rename the url parameter when you're creating the question.
For example the example above, if your system required the token be named simply `token` then you would
enter `https://teams.com?token={{endlink_token}}` as the endlink url.
The supported variables are:
The token that was present as a parameter to the endlink URL when the user
landed on your site from TARTLE, use this when you need to change the name
of the default `tartle_endlink_token` parameter.
The id of the seller that clicked the link, use this when you need to change
the name of the `seller_id` parameter.
This property is **not** included automatically but you can add it using
double curly braces. You could need this if you have several packets with us
and you need to identify this particular user + packet interaction in your
system
You do **not** need to add anything to your url if you don't need to change
the name of the default parameters, `tartle_endlink_token` and `seller_id` are
added automatically by the system.
## The TARTLE packet review process
Once you have submitted your packet, it will be reviewed by TARTLE. If you'd like to speed up the process,
you can contact us at support@tartle.co to request an expedited review.
Next you will need to integrate token handling on your site. You can do this on the server or the client. We **strongly recommend**
doing this on the server side as it is more reliable than doing it on the browser due to browser versions, browser security, and other issues.
Continue on to [token handling](/endlinks/token-handling)
---
## / endlinks
Source: https://documentation.tartle.co/endlinks
# Endlinks Introduction
Endlinks are a powerful feature of the TARTLE marketplace that enable a simple integration between
TARTLE and external systems. They provide a mechanism to direct sellers from TARTLE to your website
or application while maintaining contextual information about the interaction.
## What are Endlinks?
An Endlink is a special type of question within a TARTLE data packet that contains a URL specified
by the buyer. When a seller views the packet, this URL is presented as a clickable link. The system
adds specific parameters to the URL, primarily the `tartle_endlink_token`, which is a secure
token which will allow TARTLE to identifiy both the seller and the specific packet question later when
the buyer calls the Endlink endpoints.
## Key Characteristics
- Endlinks are typically designed to be the only question in a packet
- They serve as a bridge between TARTLE and external systems
- They enable verification and feedback for user actions on external systems
- They support various integration patterns (api calls, redirects, or with a widget)
## The typical endlink flow
```text {{ title: 'Called as api call'}}
https://source.tartle.co/api/v3/endlinks/complete?tartle_endlink_token=
https://source.tartle.co/api/v3/endlinks/fail?tartle_endlink_token=
https://source.tartle.co/api/v3/endlinks/quota_full?tartle_endlink_token=
https://source.tartle.co/api/v3/endlinks/screenout?tartle_endlink_token=
```
```text {{ title: 'Called as redirect'}}
https://source.tartle.co/api/v3/endlinks/complete.html?tartle_endlink_token=
https://source.tartle.co/api/v3/endlinks/fail.html?tartle_endlink_token=
https://source.tartle.co/api/v3/endlinks/quota_full.html?tartle_endlink_token=
https://source.tartle.co/api/v3/endlinks/screenout.html?tartle_endlink_token=
```
The token that was present as a parameter to the endlink URL when the user
landed on your site from TARTLE.
- **Complete**: Marks the packet as successfully completed and publishes it.
- **Fail**: Marks the interaction as failed and filters the packet from the seller's list
- **Quota Full**: Indicates your quota is full and filters the packet from the seller's list
- **Screen Out**: Indicates the seller did not qualify and filters the packet from the seller's list
The following pages will guide you through the steps for creating a packet with an endlink, extracting and storing
the token on your site and using it to report the results of the user's actions.
Continue to the [Creating endlinks](/endlinks/creating-endlinks) page to get started.
---
## / endlinks / redirects
Source: https://documentation.tartle.co/endlinks/redirects
# Using Endlinks with browser redirects
After your user has completed the flow you've implemented on your site, you need to report the outcome to TARTLE.
One approach is to use browser redirects to send users directly to the appropriate TARTLE endpoint.
This method is very simple to implement, but will take users away from your site.
Depending on how you [captured and saved the token](/endlinks/token-handling), you will need to retrieve it
and include it in the redirect URL to the [appropriate endpoint](/endlinks#endlink-status-endpoints).
For the examples below, we will use the `complete` endpoint, but you can use the other endpoints in the same manner.
## Server-side examples
These examples show how to implement redirects from your server:
```js {{ title: 'Express' }}
const redirectToTartleComplete = (req, res) => {
const token = req.session.tartle_endlink_token
if (!token) {
// CRITICAL: Log missing token error - you will need it to debug possible issues.
return res.status(400).send('Cannot complete TARTLE flow: Missing token')
}
// Redirect the user to the TARTLE complete endpoint
return res.redirect(
`https://source.tartle.co/api/v3/endlinks/complete.html?tartle_endlink_token=${token}`,
)
}
```
```js {{ title: 'Nextjs api' }}
const redirectToTartleComplete = async (req, res) => {
const session = await getSession({ req })
const token = session?.tartle_endlink_token
if (!token) {
// CRITICAL: Log missing token error - you will need it to debug possible issues.
console.error('No TARTLE token found in session')
return res
.status(400)
.json({ error: 'Cannot complete TARTLE flow: Missing token' })
}
// Redirect the user to the TARTLE complete endpoint
return res.redirect(
`https://source.tartle.co/api/v3/endlinks/complete.html?tartle_endlink_token=${token}`,
)
}
```
```ruby {{ title: 'Rails' }}
def redirect_to_tartle_complete
token = session[:tartle_endlink_token]
unless token.present?
# CRITICAL: Log missing token error - you will need it to debug possible issues.
Rails.logger.error 'No TARTLE token found in session'
redirect_to error_path, alert: 'Cannot complete TARTLE flow: Missing token'
return
end
# Redirect the user to the TARTLE complete endpoint
redirect_to "https://source.tartle.co/api/v3/endlinks/complete.html?tartle_endlink_token=#{token}"
end
```
```java {{ title: 'Java Spring' }}
@GetMapping("/complete-tartle-flow")
public String redirectToTartleComplete(HttpSession session, RedirectAttributes redirectAttrs) {
String token = (String) session.getAttribute("tartle_endlink_token");
if (token == null || token.isEmpty()) {
// CRITICAL: Log missing token error - you will need it to debug possible issues.
logger.error("No TARTLE token found in session");
redirectAttrs.addFlashAttribute("error", "Cannot complete TARTLE flow: Missing token");
return "redirect:/error";
}
// Redirect the user to the TARTLE complete endpoint
return "redirect:https://source.tartle.co/api/v3/endlinks/complete.html?tartle_endlink_token=" + token;
}
```
```php {{ title: 'PHP' }}
function redirectToTartleComplete() {
$token = $_SESSION['tartle_endlink_token'] ?? null;
if (!$token) {
// CRITICAL: Log missing token error - you will need it to debug possible issues.
error_log('No TARTLE token found in session');
header('Location: /error.php?message=Missing+TARTLE+token');
exit;
}
// Redirect the user to the TARTLE complete endpoint
header('Location: https://source.tartle.co/api/v3/endlinks/complete.html?tartle_endlink_token=' . urlencode($token));
exit;
}
```
```python {{ title: 'Python (Flask)' }}
@app.route('/complete-tartle-flow')
def redirect_to_tartle_complete():
token = session.get('tartle_endlink_token')
if not token:
# CRITICAL: Log missing token error - you will need it to debug possible issues.
app.logger.error('No TARTLE token found in session')
flash('Cannot complete TARTLE flow: Missing token', 'error')
return redirect(url_for('error_page'))
# Redirect the user to the TARTLE complete endpoint
return redirect(f'https://source.tartle.co/api/v3/endlinks/complete.html?tartle_endlink_token={token}')
```
## Client-side examples
You can also implement redirects client-side. You could add the complete url as the `href` attribute to an anchor tag or
use the `window.location.href` property to redirect the user.
```html {{ title: 'As link' }}
Get your reward
```
```js {{ title: 'Using localStorage' }}
function redirectToTartleComplete() {
const token = localStorage.getItem('tartleEndlinkToken')
if (!token) {
// CRITICAL: Log missing token error - you will need it to debug possible issues.
console.error('No TARTLE token found in localStorage')
return false
}
// Redirect the user to the TARTLE complete endpoint
window.location.href = `https://source.tartle.co/api/v3/endlinks/complete.html?tartle_endlink_token=${token}`
return true
}
```
```js {{ title: 'Using cookies' }}
function redirectToTartleComplete() {
const cookies = document.cookie.split(';')
const tokenCookie = cookies.find((cookie) =>
cookie.trim().startsWith('tartleEndlinkToken='),
)
const token = tokenCookie ? tokenCookie.split('=')[1].trim() : null
if (!token) {
// CRITICAL: Log missing token error - you will need it to debug possible issues.
console.error('No TARTLE token found in cookies')
return false
}
// Redirect the user to the TARTLE complete endpoint
window.location.href = `https://source.tartle.co/api/v3/endlinks/complete.html?tartle_endlink_token=${token}`
return true
}
```
## Considerations
- The `tartle_endlink_token` is only valid for one hour, so make sure you perform the redirect within that time frame.
- Browser redirects will take users away from your site. If you want to provide a seamless experience, consider using the [API-based approach](/endlinks/api-calls) instead.
- Please make sure to log errors and failures so you can debug any issues, if you don't report an outcome due to an error, we will treat it as a failure,
and the user **will not receive payments** for this packet.
Having issues? See our [Endlink troubleshooting guide](/endlinks/troubleshooting).
---
## / endlinks / scripts
Source: https://documentation.tartle.co/endlinks/scripts
# Using Endlinks with embeddable scripts
We also offer another option for very simple use cases that only need to report success. TARTLE provides
two javascript files you can embed on your html via `
```
For an example of a page that would work as an endlink destination, see this
[example landing
page](https://github.com/Tartle-co/tartle-platform-examples/blob/main/endlinks/widgets/index.html)
## Complete script
Requirements:
1. The page where you embedded the landing script **must** be different than the one where you embed the complete script.
2. There must be no redirects in this flow, if the user is redirected to log in automatically for example, the
script will not have enough time to save the token.
```html {{ title: 'Embedding the complete script' }}
```
This script will make the api call as soon as the script is loaded and executed, so it's best to make a completion
page to inform the user they are done and they were successful, and embedding the script on that page.
Here is an example of a [completion
page](https://github.com/Tartle-co/tartle-platform-examples/blob/main/endlinks/widgets/final.html)
## Best use cases
When using these scripts you can only report sucesss (completion). Any user packets that go to your endlink url
and don't end up in a completion page will remain incomplete. This is why it's important that you make sure
you follow the requirements in both sections above to avoid false negatives where the user completes your requirements but completion
is not reported, which will result in loss of possible profits for the user.
The best use case for this is for sites that are rendered as separate html pages, and flows that do not rely on
redirects upon landing.
Even in the best of circumnstances, since this is a client-based flow you can end up with false positives because
of old browsers, security settings that prevent access to localStorage, and other issues. For better reliability,
we recommend using the server examples for [api calls](/endlinks/api-calls) or [browser redirects](/endlinks/redirects).
---
## / endlinks / spa
Source: https://documentation.tartle.co/endlinks/spa
# Using Endlinks in single page applications
If you use a single page application framework like React, Angular or Vue, and you have a server-side,
the recommended approach is to use the [api calls](/endlinks/api-calls) solution.
However if you have a Single Page App and need to use endlinks on browser, you can't rely on
our widgets since technically everything lives in the same page. Instead you can use your application
state to persist the token across pages as well as use `localStorage`, cookies or your database solution
if you expect the completion of your flow to happen beyond this session.
For an example of how to use React Context to persist the token below. But you could as well use Redux or
another state management solution.
## Using React Context
For example using this React Context to wrap around your app, you can set and retrieve the token
from different components:
```jsx {{ title: 'React Context example' }}
const EndlinkContext = createContext(null)
export function EndlinkTokenProvider({ children }) {
const [endlinkToken, setEndlinkToken] = useState(null)
useEffect(() => {
console.log('Endlink token was set to', endlinkToken)
}, [endlinkToken])
return (
{children}
)
}
export function useEndlinkToken() {
const context = useContext(EndlinkContext)
if (!context) {
throw new Error(
'useEndlinkToken must be used within a EndlinkTokenProvider',
)
}
return context
}
```
## Setting the token
On the component that loads in your landing url (the endlink url you added to the packet), you would set
the token using the `setEndlinkToken` function from the hook in the context file_get_contents
```jsx {{ title: 'Setting the token' }}
const { endlinkToken, setEndlinkToken } = useEndlinkToken()
// Capture the token on mount
useEffect(() => {
const searchParams = new URLSearchParams(window.location.search)
const endlinkToken = searchParams.get('tartle_endlink_token') || null
if (endlinkToken) {
setEndlinkToken(endlinkToken)
}
}, [])
```
## Retrieving and using the token
Then later in the component that loads when your user has completed the flow you would retrieve the
token and make the appropriate call to one of our [Endlink endpoints](/endlinks#endlink-status-endpoints).
```jsx {{ title: 'Retrieving the token' }}
const { endlinkToken } = useEndlinkToken()
// ...
// Later, you can make the api call depending on the outcome. 'GET' is implied but added for clarity.
const endlinkUrl = `https://source.tartle.co/api/v3/endlinks/complete?tartle_endlink_token=${endlinkToken}`
fetch(endlinkUrl, { method: 'GET' })
```
For a full SPA Example using the components above, see our [example github
repo](https://github.com/Tartle-co/tartle-platform-examples/tree/main/endlinks/spa)
---
## / endlinks / token-handling
Source: https://documentation.tartle.co/endlinks/token-handling
# Handling the endlink token
Below we will show you to different ways to handle the endlink token, server-side and client-side. We **strongly recommend**
doing this on the server side if it is possible for your use case, as it is more reliable than doing it on the browser
due to browser versions, browser security settings, and other issues.
## Extract and save the token on the server.
When a user arrives at your site via an Endlink, you need to capture the `tartle_endlink_token` from the URL,
you will need to save this token securely in your system so you can later report the desired outcome for the data packet.
Whenever possible, **we recommend you capture and save this token server-side**, as doing so client-side is
error prone because of browser versions, security restrictions, and other issues.
```js {{ title: 'Express' }}
const saveToken = (req) => {
const token = req.query.tartle_endlink_token
if (token) {
req.session.tartle_endlink_token = token
return true
}
return false
}
```
```js {{ title: 'Nextjs api' }}
const saveToken = async (req) => {
const token = req.query.tartle_endlink_token
if (!token) {
return false
}
const session = await getSession({ req })
session.tartle_endlink_token = token
await session.save()
return true
}
```
```ruby {{ title: 'Rails' }}
def save_token
token = params[:tartle_endlink_token]
if token.present?
session[:tartle_endlink_token] = token
true
else
false
end
end
```
```java {{ title: 'Java Spring' }}
public boolean saveToken(HttpServletRequest request, HttpSession session) {
String token = request.getParameter("tartle_endlink_token");
if (token != null && !token.isEmpty()) {
session.setAttribute("tartle_endlink_token", token);
return true;
}
return false;
}
```
```php {{ title: 'PHP' }}
function saveToken() {
$token = $_GET['tartle_endlink_token'] ?? null;
if ($token) {
$_SESSION['tartle_endlink_token'] = $token;
return true;
}
return false;
}
```
```python {{ title: 'Python' }}
def save_token(request, session):
token = request.args.get('tartle_endlink_token')
if token:
session['tartle_endlink_token'] = token
return True
return False
```
## Extract and save the token on the client.
When doing it on the server is not possible, you can handle the token on the client with javascript. Storing it in
localStorage or cookies is the most common approach. For security reasons, the token is only valid for one hour and
only works with this user/packet interaction.
```js {{ title: 'Using localStorage' }}
function saveTokenWithLocalStorage() {
const urlParams = new URLSearchParams(window.location.search)
const token = urlParams.get('tartle_endlink_token')
if (token) {
localStorage.setItem('tartleEndlinkToken', token)
console.log('Token saved to localStorage')
} else {
console.error('No tartle_endlink_token found in URL parameters')
}
}
```
```js {{ title: 'Using cookies' }}
function saveTokenWithCookies() {
const urlParams = new URLSearchParams(window.location.search)
const token = urlParams.get('tartle_endlink_token')
if (token) {
const expirationDate = new Date()
expirationDate.setTime(expirationDate.getTime() + 24 * 60 * 60 * 1000)
document.cookie = `tartleEndlinkToken=${token}; expires=${expirationDate.toUTCString()}; path=/; SameSite=Strict`
console.log('Token saved to cookies')
} else {
console.error('No tartle_endlink_token found in URL parameters')
}
}
```
You can now walk the user through the flow you've implemented on your site to capture whetever actions you need. This could be any flow,
the only limitation is that the `tartle_endlink_token` is only valid for one hour, so they must be able to complete
your flow in that amount of time.
Once you know the outcome of the user's actions (is this a success, failure, etc?) you need to report it to TARTLE. You have
a few options on how to do this.